Category Archives: John Muir Trail

Technology for the JMT

It is now 4 days from the time I board a plane for Reno, rent a car and drive to June Lake outside of Yosemite.  I am finalizing my gear and packing everything up for the trip.  The last unresolved decisions involve technology and I have brought that process to a close.  Here is the tech that will accompany my 211 mile trek on the John Muir Trail;

  • InReach Explorer
  • Garmin Etrex 30x
  • Apple iPhone 6
  • Ankar PowerCore 20100 Battery Charger
  • Assorted cables and adapters
  • Total Weight:  2.1 lb
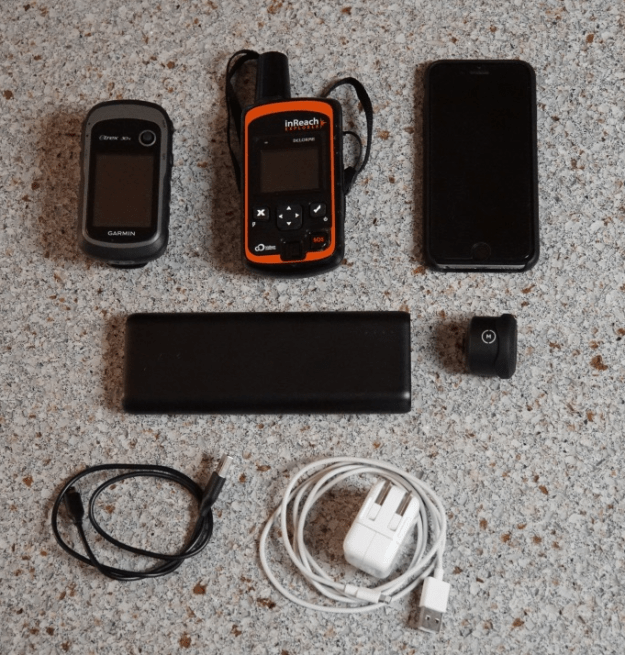
 

Tech for JMT

InReach Explorer

The InReach Explorer has two key functions; satellite texting and SOS emergency communication.  The texting, although crude in the user interface, will be the only way I have to communicate in the remoteness of the JMT.  All my research indicates the trail is generally beyond the reach of cell tower signals.  The InReach will hold a charge for about 4 – 5 days of hiking. It will track my progress and post to a website where friends and family can follow.  Weight: 6.8 oz

Garmin Etrex 30x

This is a brand new edition to my gear set.  I wanted GPS capability that was not available in the InReach but my Garmin fenix 3 watch was not going to make the cut, primarily because it only holds a charge for 2 days of full hiking and needs to be recharged.  I chose the Garmin Etrex 30x for its basic GPS functionality and the fact it runs on AA batteries.  The specs indicate it will run for 16 hours so I’ll carry extra batteries.  My testing has proven the device to be reliable and easy to use.  Plus it will upload results to my Garmin Connect website, which is what I have been using now for years.  Weight:  5.7 oz

Apple iPhone 6

The iPhone will be my camera, saving  about 4 lbs of camera gear.  The iPhone took great pictures in the Grand Canyon so it should be fine.  I found a telephoto lens that is small and weighs nearly nothing.  I have maximized storage space by getting rid of most apps (including email), pictures and media leaving about 54 GB for photos and video clips.  I don’t believe the empty memory space save any weight.  I could not find how much a GB weighs anyway.  In airplane mode, the battery should last 4 or 5 days. Weight:  7.8 oz (w/ lens)

Ankar PowerCore 20100

The iPhone and the InReach Explorer will need to be charged at least once before I get to Muir Trail Ranch and probably twice between there and Mt. Whitney.  I researched a number of websites and blogs, considering solar chargers and high density power chargers.  One has to learn how these devices are rated and fortunately, the hiker community has developed a bit of a standard of how many times you can charge your smartphone.  The chargers are specified by the number of milliAmp hours, but one thing to note, the airlines have a restriction on lithium batteries measured in Watt hours, which is the total volts multiplied by the Amp hours.  The limit is 100 Watt hours.

I opted not to use a solar charging system.  The ones I researched indicated you needed to charge the battery a full day to get 1 smartphone charge.  With two devices, I did not want to run the risk that they both ran down on the same day.  Plus, many of the reviews indicated that weight was a bit of an issue when you count the flexible solar panel and the battery in the system.

That leaves the lithium battery chargers.  I found these are typically rated in milliAmp hours (mAh).  A 7,800 mAh will charge a smart phone up to 3 times and weighs around 6.5 oz.    More is better right?  But bigger chargers come with more weight.

My choice ended up being the Ankar 20100, which is a 20100 mAh battery charger weighing in at 12.7 oz.  The literature boasts 7 charges of a standard smartphone.  It has two USB ports making it possible to charge two devices at a time.  Running the math, it registers a 72.6 Wh capacity, which should not be a problem for the FAA.

Assorted Cables

A USB for the phone and the InReach, plus a 10W power adapter weigh in at 3.5 oz.

HikerHead 2

Strider Out!

Mailing Groceries to Myself

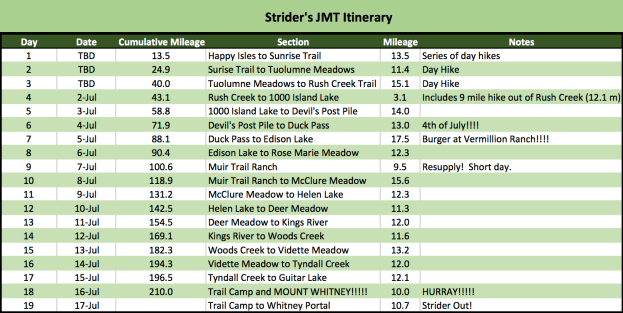
I have a long To-Do list and today I checked off a big part of it.  Planning food for 15 days in the wilderness takes a little research and some strategy.  Once you leave Yosemite on the JMT, there are basically two places to resupply; Vermilion Valley and Muir Trial Ranch.  Vermilion is about four days out from Donahue Pass while Muir Trail Ranch is a good 6 days out.  The challenge is getting past Muir Trail Ranch because there is not another good resupply location until after you exit Whitney Portal, which I plan to cover in about 8 days.  This means you have to send your food to yourself.  Opting for Muir Trail Ranch, I set about planning supplies and how to get them there.

Constraints

In strategic planning, one of the things you have to know is your constraints and boundaries.  Muir Ranch is about 8-9 hiking days away from Mt. Whitney.    My bear can only holds about 7 days of food.  Getting supplies sent to Muir Ranch can take up to 3 weeks.  There are no full service grocery stores there.  Shipping food ain’t cheap.  Backpacking requires 3,500 – 5,000 daily calories.  You want to keep your pack as light as possible.

Planning the Food

The first thing to do is plan the menus.  The common wisdom is to be creative and save money by creating your own meals.  I opted for spending the money and bought 20 freeze dried dinners from REI.  I had a 20% off coupon and I spent my dividend.  The rest was packaged food from the grocery store.

My standard daily menu is essentially the following:

  • Breakfast – Oatmeal, honey, summer sausage, cocoa w/ coffee              450 calories
  • Lunch – Peanut butter, honey, tortillas, tuna                                              550 calories
  • Dinner – Freeze Dried dinner, chocolate, tea w/ honey, olive oil         1,200 calories
  • Snacks – granola bar, fig bars, nuts                                                            1,300 calories
  • TOTAL:                                                                                                            3,500 calories

I am going to run a calorie deficit, which many thru hikers do.  If I could carry 5 – 7 days food between towns, I could carry more calorie laden food, plus engorge myself in town, but space and weight are the biggest constraints.  Plus I could stand to loose 10 lbs.

Getting It There

I crammed the first 7 days in my bear can, which will fly with me to California.  The rest I had to ship to myself when I arrive at Muir Trail Ranch on July 7.  Muir Ranch has a process.  You go onto their website and pay a food pickup and storage fee of $85.  They send you mailing labels, along with detailed instructions.  You need to pack your food in a plastic 5 gallon bucket.  That’s because it will arrive at their PO Box, which then has to be carted by truck, possibly canoed across a lake, and finally stored in a shed.  Your food container has to be water proof and varmint proof.   They limit you to 25 lbs without charging you even more and they suggest shipping three weeks in advance.

Shipping a 22 lb bucket is not trivial.  There is a lot of packing tape involved.  It is not a convenient box that comes with efficient and cheap postage.  Priority mail from Knoxville to California is $66.00.  I spent about 2/3 of my food cost in shipping and handling.

But it is DONE!

The one open issue is that my bear can will not hold all the food in the bucket.  I am going to noodle on that one for a bit.  One option is to purchase a small bear can and carry both.  Another is to take less food.  I’ll have a week under my belt by the time I get there.

I may go a bit hungry but at least I won’t starve.


HikerHead 2

Strider Out!


My JMT Gear List

fullsizeoutput_52aWhen it’s raining outside and you are too wimpy to go backpacking in it, you go through your gear, weighing everything in preparation for the obligatory gear checklist.  And of course, the picture of your possessions in the House on Your Back.  On the gear spectrum, I tend to fall near the ultralight folks but I am willing to make compromises for comfort and convenience and I readily admit this list is somewhat flexible.  I own no Cuban fiber.  But just for kicks, I did cut the handle off my tooth brush and I have been known to trim the borders off my maps.

The Big Three – 6.3 lb.

I am very pleased with how the big three (pack, tent, sleeping bag) ended up.  My ULA Catalyst is roomy for the bear can but I took out the plastic back support saving a pound.  I made the investment in a Western Mountaineering down bag and it was a good one.  I’m not yet convinced quilts have that much of an advantage, at least not enough to invest in one to save about 6 oz.  The one compromise was the tent over a tarp.  Ease of setup and built in bug protection carried the day.  The REI Quarter Dome one came in at only 2 lb. 2 oz. amking it the secound heaviest piece of gear.  I am still debating over my sleeping pad.  The Ridgerest is light but my old bones sure appreciate a self-inflatable.  That would add about 6 oz.

The Kitchen – 3.8 lb.

Here is where I will find out if anyone reads this stuff.  I DON’T GET THE ALCOHOL STOVES!!!  Check my previous article where I did a performance test between my super light and reliable MSR Pocket Rocket and my homemade alcohol stove.  My conclusion was whatever few oz. you spend on a stove/canister more than compensates for the amount of time… and fuel… it takes to heat water with alcohol.  The bear can is the obscene weight hog here at 2 lb 11 oz.  The rest of the kitchen is 1.1 lb.

The Closet – 3.9 lb.

I guess the biggest question here is whether to take the set of long johns.  They weigh almost a pound.  I like sleeping in them, even in the summer because they keep my bag clean.  I could save a half pound by using just the tee shirt and leaving the top.  The rain gear serves as wind protection.  The pants may get left home though since I tend to wear long pants hiking.  I don’t really need long johns AND rain pants for warmth.

Misc. – 1.5 lb.

The biggest weight here is my first aid kit at just over a pound.  It contains first aid stuff, personal grooming, sunscreen, Vitamin I  (ibuprofen), fire starter, duct tape etc.  I could shave an ounce or three here but I’m pretty good.

Camera Gear – 3.4 lb

This is my biggest debate over weight.  I love my Sony Alpha 6300 mirrorless camera.  It takes most of the pictures you see in this blog.  The iPhone does a great job and served me well in the Grand Canyon two years ago.  Plus they now make some pretty cool lenses for it that are reasonably priced.  My total base pack weight is 20 lb. so 3.4 lb. is a significant portion – almost 20%.  I really don’t have to decide until I hit the trailhead, which is probably when I’ll make it.

Plus, leaving the Sony at home would challenge me to shed one more pound to get to 15 lb base pack weight, which, with a bear can, would impress most any thru hiker on the PCT.

TOTAL BASE PACK WEIGHT:  19.99 lbs

Gear List

That is all…

HikerHead 2

Strider Out…


The Bear Can

Bear Canister
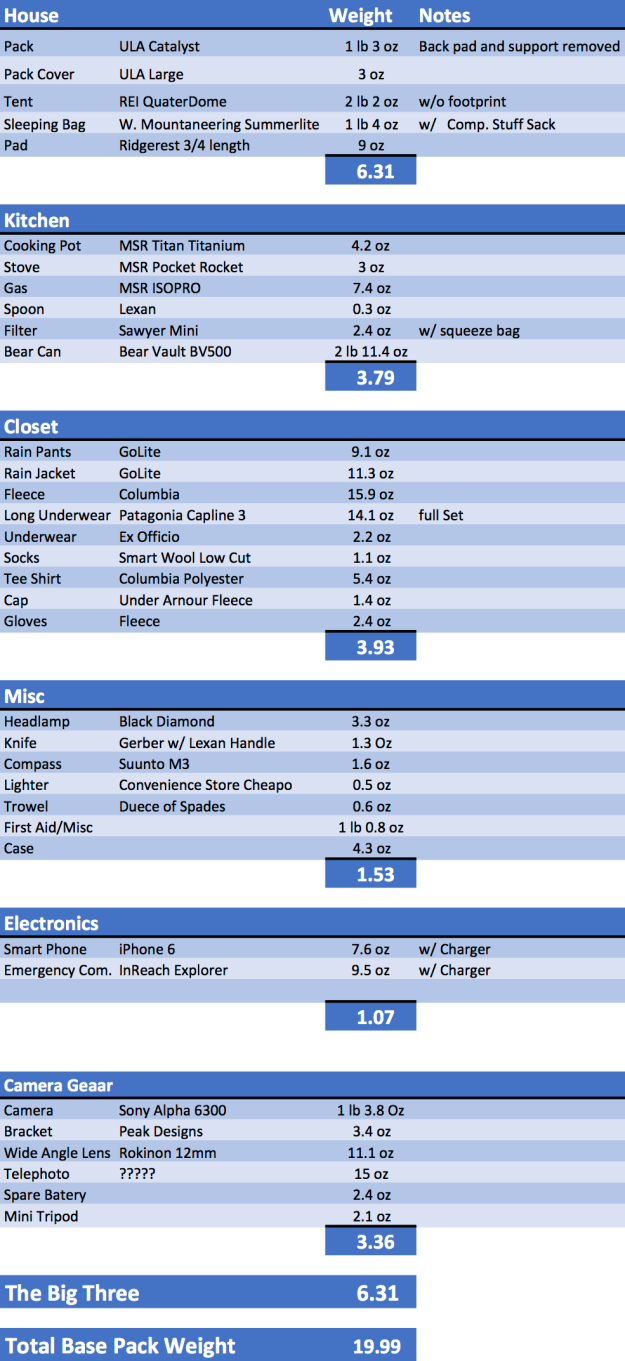
There are a number of things that make hiking out west different from hiking in the Smokies.  Elevation is one thing.  From what I can tell, I’ll be spending most of my time above 10,000 feet.  Mt. LeConte is 6594′.  Clingmans Dome is 6644′.  The tallest mountain in the east, Mitchell, is 6683′.

At those elevations, one spends a lot of time in the Sierras above tree line, which occurs around 9,500′.  No trees, no hammocks or bear bags.  And no bear cables like we are accustomed to in the Smokies.  But there ARE bears.

To that end, the Park Service and the National Forest Service require bear canisters for storage of all smellables like food, toothpaste, sunscreen, deodorant (deodorant, really???  People take deodorant???). No one ever talks about whether body odor smells like food to bears or mountain lions.

Bear canisters are available for rent, I have read, but I decided to go ahead and get my own.  I chose the Bear Vault BV 500.  I’m not sure what the “500” means.  It holds 700 cu.in. or 11.5 liters and it’s 12.7 in high and 8.7 inches in diameter.  And… it weighs 2lb 11 oz. REI price: $80.

The upsides are it is guaranteed bear proof, although there are pictures in blogs where they have failed, you don’t have to hang a bear bag, and it provides a great seat upon which to rest while cooking dinner.  At the end of the day, you just set the can 200 feet away from the tent and hope no one plays overnight soccer with it.

The downsides – big and heavy and expensive.  The BV 500 is among the cheaper options.  They can go as high as $200 and weigh over 3.5 lb.  All this light weighting I am trying to employ goes away when you add nearly three pounds of food container, making it the heaviest single item in my pack.  And unlike a good water proof food bag, it does not get smaller when you eat the food.

That’s I have to say about that…

HikerHead 2


Shalom –

Strider out!

Strider’s JMT Itinerary (tentative) is Released!

The permitting process allows for (requires?) a daily itinerary.  Recalling my last post and the utter frustration one meets in trying to complete this process before a 5-minute timeout, only to find out the system accepts incorrect destinations once you are past your entry and exit point, I had to go back to fill it all in with the right stuff.  So after careful research and planning out reasonable daily mileages I came to realize that most of the campsites are not available in the drop down menus of the permitting process so officially, I am spending most nights at a place called “other”.  I really hope it’s nice and there’s water.

As Patton said, “No battle plan survives first contact with the enemy,” which calls into question why one would even try to plan out an itinerary.  My AT thru hike itinerary many years ago was pretty much blown up the first day.  But the value in planning is not the end product, but the process of thinking through various strategies.  In this case, where to re-supply.  There are a number of resupply points along the first half of the JMT, but there is only one for the last half and that is at Muir Trail Ranch.  Since I am actually entering the trail officially at Rush Creek, I only need 5 days of supplies to get to Muir Trail Ranch so I guess it’s just one re-supply for me.  Much more on that later. My itinerary calls for 10 days of supplies from there to Whitney Portal.

There are some excellent resources to help plan a thru hike of the JMT.  Most promote a 21-day itinerary, which I loosely followed.  Here is the list of references that were helpful in this project:

  • The John Muir Trail:  Through the Californian Sierra Nevada by Alan Castle
  • John Muir Trail: The Essential guide to Hiking America’s Most Famous Trail by Elizabeth Wenk
  • John Muir Trail Data Book by Elizabeth Wenk
  • John Muir Trail Topographic Map Guide by National Geographic

I am hopeful of beating this schedule to some extent as I generally hike 15 – 18 miles a day but there are a couple caveats – First, the highest mountains on the east coast are only 6,000 feet, while much of the JMT is above 10,000 feet.  I am brushing up on those who have had bouts with altitude sickness and the general word is that hiking south, you get to acclimatize to some extent.  The second issue is the specific exit date, which is required of the permitting process.  Who knows what happens if you try to leave early…  Do the rangers make you go back and wait it out or do they just write out a ticket?  Who knows?  I imagine this will be a topic of conversation once I am on the trail.  At the very least, maybe I can save up some time for a zero day somewhere really nice.

So here is it, the published itinerary:

JMT Itinerary

That is all…

HikerHead 2   Strider Out!

The Elusive JMT Permit: An Alternative Plan

The magazine blogs with the “Top Ten Bucket List Hikes” usually mention the John Muir Trail like it’s something you decide to do tomorrow.  I’m spoiled here in Tennessee because we can actually decide to take a hike the next day in the Smokies and just go… most of the time.  But our national parks are being loved to the point of overuse and high impact. Crowd control, even in the back country, becomes a necessary evil.  Such is the case with the John Muir Trail in Yosemite.

Image result for Permit requests for JMT
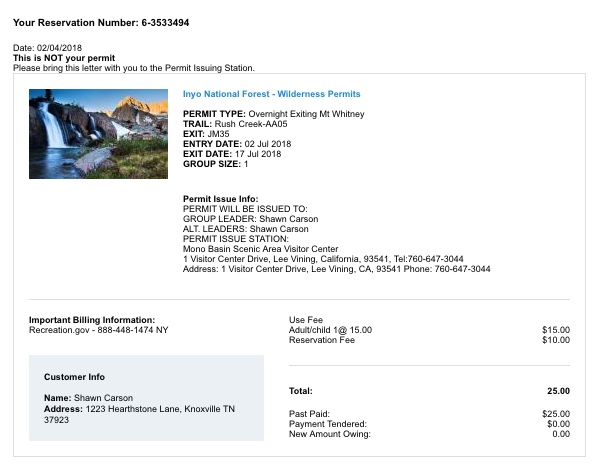
The Park Service and the US Forest Service have an impossible task.  With serious under-funding, they have to find a way to manage millions of visitors while trying to maintain the integrity of the wilderness experience, not to mention the wilderness herself.  And so they implement controls and bureaucracy.  Perhaps the most difficult part of hiking the JMT is actually the permitting process and the blogs fail to point that out beyond a brief mention that you can apply for your permits six-months in advance.  The National Park Service issues 45 permits a day to exit Donahue Pass.  During my efforts I was told by the Park Service that the chances of getting a permit in advance for July are about 5%.  I have an email folder with no less than 32 denied permit requests.  The other option for Yosemite is to show up the day before you want to start your hike, hoping to get one of 10 walk up permits issued each day.  That guy five people in front of you getting permits for a group of 6 means you’re done.  A JMT hiker named Sprout shared her experience with the walk up permit process. on The Trek.

The Park Service made it more convenient when they let you put in a range of dates over a over 21 days whereby you can automatically be re-entered for the next day’s lottery.  It was halfway through this process that I decided that “getting a JMT Permit for Yosemite needs to be plan B”

“Getting a JMT Permit for Yosemite needs to be Plan B”

Other options include hiking north from Mt. Whitney, getting a 500 miler PCT Permit, and the option I chose, starting the JMT about 3 miles south of Donahue Pass in the Ansel Adams Wilderness.  The permitting process is perhaps no less onerous but at least your odds of securing a permit are much greater.

JMT Permit - InyoPermits outside Yosemite are managed by the Inyo National Forest  The trick here is you have to apply for an entrance permit AND and exit permit if you are going to exit at Whitney Portal.  Just like Yosemite, you can apply up to six months in advance.  Permits are limited, especially for Whitney Portal, but their availability is much greater than the Yosemite permits.  The Rush Creek trail joins the John Muir Trail just 3 miles south of Donahue Pass and as of early-February, there were plenty.  The exit permits for Whitney Portal were more of a challenge and I should have applied a couple weeks earlier, but luck was with me and I secured an exit date.  If Whitney Portal permits are not available, one option is to hike past Whitney Portal to the next trailhead 35 miles south.  The Yosemite permits do not require an exit permit for Whitney Portal.

IMPORTANT TIP:  The Recreation.gov website that manages the permits for the USFS gives you a limited amount of time (5 minutes or so) to complete your permit request.  The JMT Trail requires 15 – 20 days to complete and the website requires a specific location for every camp.  So you get your start and end date and then you begin inputting your camping nights when the website times out.  After three attempts and pulling part of my beard out in frustration, I called the Inyo Forest Service Permit Office.  They were sympathetic and gave me a clue.  The website does not have any logic about your camping schedule between start and exit.  All you have to do is put anything in those fields, pay for and submit your permit request, and then fix the schedule later.

So now the plan is to day hike sections of the JMT in Yosemite.  But even if you simply must start your hike in Yosemite, I would still have the Forest Service Permit ready so if the walk-up strategy fails, you have a backup.  Just make sure to cancel your Forest Service permit if you happen to get one of those rare 10 passes.  I think I’ll sleep in that day and just go with my Inyo permit.

HikerHead 2


Strider out!

Back in the cloud… and on the trail…

… not that I have not been slowly adding to my second 900 miler map, but blogging had to make  way for research and dissertations and other life pursuits.  Now I have a few hundred miles to catch up on but I also have a new adventure in the works.

Permit to enter the Inyo National Forest south of Yosemite

I guess the adventure officially started with obtaining my permit to hike the John Muir Trail.  The adventure is a reward of sorts to myself on the completion of my Ed.D. this coming May.  Pursuing a terminal degree in your fifth decade is probably an odd thing to do, but it fits with other paths I have set out on in my life.  At the time, it made sense to cut a pathway to my last career leading into my retirement years. This in itself was a change for me because I have always had my finger in the wind and shifted direction when new opportunities revealed themselves.  But this was different.  I figured I could find a teaching job at a nice small college in the mountains somewhere and spend my off-days hiking.   I was offered some sage advice that obtaining a terminal degree might provide added credibility and qualification to such a pursuit so I found a way to ‘ejecate’ myself while maintaining my current lifestyle. So over the last 4 years, I have been writing papers, researching topics, and generally dipping my toes into the pool of the academic life.  Little did I know, my academic life would find me early than I had planned and I now have a great gig teaching entrepreneurship at the University of Tennessee in Knoxville, a medium sized city near the mountains where I can hike on my off-days. I must say, the pool of academic life feels just fine!

Becoming a “doctor” of anything is not a trivial pursuit.  It is, in part, a matter of survival in that research and academia has it’s own flow, its own culture and its own processes, into which one must acclimate.  The experience is intentionally rigorous as it should be and by the third year, you are over half way but still far from the finish.  But the underlying blessing is that you can begin to see  the finish line from where you are and it slowly gets bigger as it materializes from the desert mirage that has loomed before you for so long.  Then, just as momentum is gaining, you hit the last obstacle; a big pool of quicksand called the Dissertation.  It is the epitome of your introduction into the academic life and just like boot camp, it is academia’s way of making sure you are cut out for this life and it throws everything at you; literature reviews, comments from your committee, endless revisions, making changes for the sake of making changes.  But the biggest challenge no one prepares you for is the one that tests your perseverance to its very limits.  That is figuring out how to generate a Table of Contents in MS WORD.  I really wish I had those 6 hours of my life back.

Long into this experience, you provide yourself with motivation and encouragement by thinking of what life will be like on the other side.  If you notice, there is a quote at the headline of this blog by one of the founding fathers of the wilderness experience for its own sake.  This quote has been a guiding star for me ever since my awareness turned to it.  It is only fitting to celebrate the culmination of this life milestone by walking the path honoring the one who showed me how to walk in the Garden itself.

So now, my 2nd 900 Miler Map has an added purpose; to prepare me for the 217.9 miles of the John Muir Trail.  I’ll be sharing the planning of this adventure as it comes along.

“Between every two pines is a pathway to a new world” – John Muir

Strider Out!